Entity Framework introduced automated migration so that you don't have to process database migration manually for each change you make in your domain classes.
The automated migrations can be implemented by executing the
enable-migrations command in the Package Manager Console. Open the Package Manager Console from Tools → Library Package Manager → Package Manager Console and then run the enable-migrations –EnableAutomaticMigration:$true command (make sure that the default project is the project where your context class is).
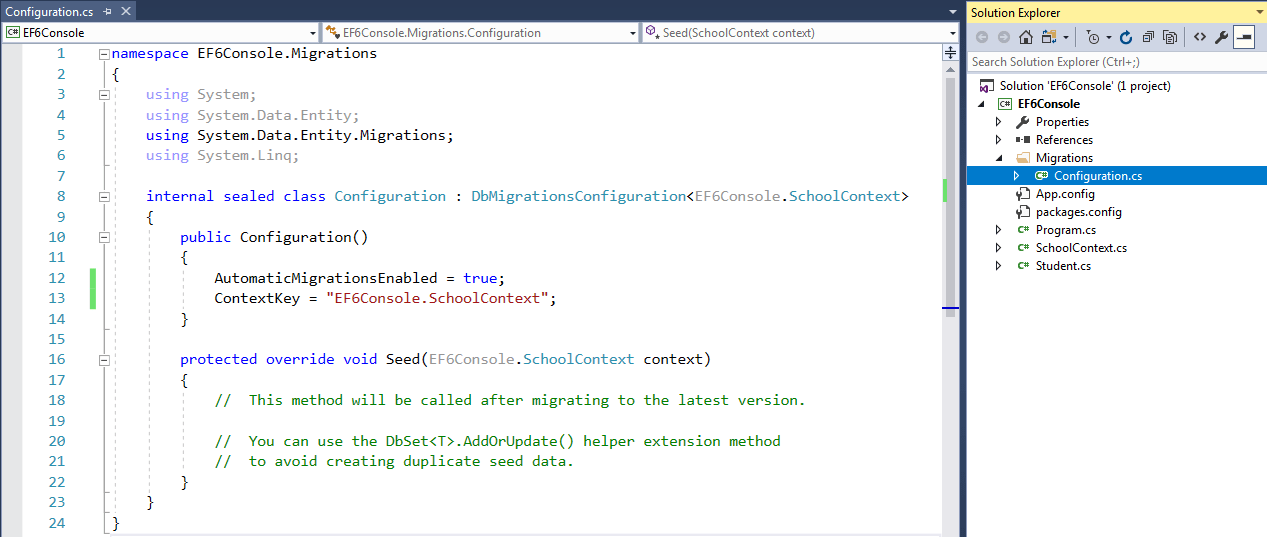
Once the command runs successfully, it creates an internal sealed
Configuration class derived from DbMigrationConfiguration in the Migration folder in your project:
As you can see in the constructor of the
Configuration class, AutomaticMigrationsEnabled is set to true.
The next step is to set the database initializer in the context class to
MigrateDatabaseToLatestVersion, as shown below.public class SchoolContext: DbContext { public SchoolDBContext(): base("SchoolDB") { Database.SetInitializer(new MigrateDatabaseToLatestVersion<SchoolDBContext, EF6Console.Migrations.Configuration>()); } public DbSet<Student> Students { get; set; } protected override void OnModelCreating(DbModelBuilder modelBuilder) { base.OnModelCreating(modelBuilder); } }
Now, you are all set for automated migration. EF will automatically take care of the migration when you change the domain classes. As of now, we only have the
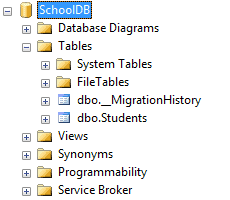
Student entity as per the SchoolContext class above. Run the application and look at the created database:
You will find that EF API created a system table
__MigrationHistory along with the Students table. The __MigrationHistory table contains the history of database changes for all the migrations.
Now, you can add new domain classes and when you run the application again and you will see that the database contains tables for all entities automatically. You don't need to run any command.
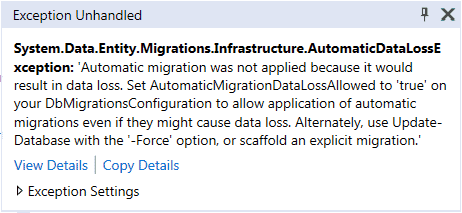
However, this works only if you add new domain classes or remove classes, but it won't work when you add, modify or remove properties in the domain classes. To do this, remove any property from any domain class and run the application. You will get the following exception.

This is because you will lose data in the corresponding column of a property. So, to handle this kind of scenario, you have to set
AutomaticMigrationDataLossAllowed to true in the Configuration class constructor, along with AutomaticMigrationsEnabled = true;.
To know more about the
enable-migrations command parameters, execute the get-help enable-migrations and get-help enable-migrations -detailed commands in PMC, as shown below.PM> get-help enable-migrations
NAME
Enable-Migrations
SYNOPSIS
Enables Code First Migrations in a project.
SYNTAX
Enable-Migrations [-ContextTypeName <String>] [-EnableAutomaticMigrations]
[-MigrationsDirectory <String>] [-ProjectName <String>] [-StartUpProjectName
<String>] [-ContextProjectName <String>] [-ConnectionStringName <String>]
[-Force] [-ContextAssemblyName <String>] [-AppDomainBaseDirectory <String>]
[<CommonParameters>]
Enable-Migrations [-ContextTypeName <String>] [-EnableAutomaticMigrations]
[-MigrationsDirectory <String>] [-ProjectName <String>] [-StartUpProjectName
<String>] [-ContextProjectName <String>] -ConnectionString <String>
-ConnectionProviderName <String> [-Force] [-ContextAssemblyName <String>]
[-AppDomainBaseDirectory <String>] [<CommonParameters>]
DESCRIPTION
Enables Migrations by scaffolding a migrations configuration class in the project. If the
target database was created by an initializer, an initial migration will be created (unless
automatic migrations are enabled via the EnableAutomaticMigrations parameter).
RELATED LINKS
REMARKS
To see the examples, type: "get-help Enable-Migrations -examples".
For more information, type: "get-help Enable-Migrations -detailed".
For technical information, type: "get-help Enable-Migrations -full".


.png)

0 comments:
Post a Comment
Note: only a member of this blog may post a comment.