React Datepicker Tutorial Example From Scratch is today’s leading topic. We use the package called react-datepicker for this demo. React Date Picker is a simple and reusable Datepickercomponent. There are many other packages available, but for this demo, we are using React Date Picker package for this example.
React Datepicker Tutorial Example
Install React.js using the following command.
#1: Install React.js
Type the following command.
npx create-react-app reactdates
cd reactdates
npm start
#2: Install React Date Picker
Install react-datepicker using the following command.
npm install react-datepicker --save

# or

yarn add react-datepicker
We also need to install Moment.js separately since the dependency isn’t included in the package. Below is a simple example of how to use the Datepicker in a React view. You will also need to require the CSS file from this package.
npm install moment --save

# or

yarn add moment
Also, install the bootstrap using the following command.
npm install bootstrap --save

# or

yarn add bootstrap
Okay, now we have installed all the frontend libraries. Next step is to set up the frontend.
#3: Add Datepicker to the form
Inside src >> App.js file, replace the following code inside the App.js file.
// App.js

import React, { Component } from 'react';
import DatePicker from 'react-datepicker';
import moment from 'moment';

import 'react-datepicker/dist/react-datepicker.css';
import 'bootstrap/dist/css/bootstrap.min.css';

class App extends Component {

  constructor (props) {
    super(props)
    this.state = {
      startDate: moment()
    };
    this.handleChange = this.handleChange.bind(this);
    this.handleSubmit = this.handleSubmit.bind(this);
  }

  handleChange(date) {
    this.setState({
      startDate: date
    })
  }

  handleSubmit(e) {
    e.preventDefault();
    let main = this.state.startDate
    console.log(main.format('L'));
  }

  render() {
    return (
      <div className = "container">
        <h3>React Datepicker Example</h3>
        <form onSubmit={ this.handleSubmit }>
          <div className="form-group">
            <label>Select Date: </label>
            <DatePicker
              selected={ this.state.startDate }
              onChange={ this.handleChange }
              name="startDate"
              dateFormat="MM/DD/YYYY"
            />
          </div>
          <div className="form-group">
            <button className="btn btn-success">Add Date</button>
          </div>
        </form>
      </div>
    );
  }
}

export default App;
#Explanation
Here, we have imported datpicker, moment, bootstrap libraries.
We have set the initial date to today’s date.
When the user changes the date, it will set the new state with its new values.
When the user submits the date, we get the value of the textbox, which is the object of Moment so that we can call the moment function like formate on the value of the textbox. We can format the date in whatever way we want.
Now, <Datepicker /> component has many options that we can configure it.
The most basic use of the DatePicker can be described with:
<DatePicker selected={this.state.date} onChange={this.handleChange} />
You can use onSelect event handler which fires each time some calendar date has been selected.
<DatePicker selected={this.state.date}
  onSelect={this.handleSelect} //when day is clicked
  onChange={this.handleChange} //only when value has changed
/>
onClickOutside Handler may be useful to close datepicker in inline mode.#Time picker
You can also include a time picker by adding the showTimeSelect prop.
<DatePicker
  selected={this.state.date}
  onChange={this.handleChange}
  showTimeSelect
  dateFormat="LLL" />
#4: Create the Node.js backend
Inside the root folder of reactdates, create one more folder called backend.
Go inside the folder and open the terminal and initialize the package.json file using the following command.
npm init -y
Now, install the following dependencies.
yarn add express body-parser mongoose cors

# or

npm install express body-parser mongoose --save
Also, install the nodemon as a development dependency.
npm install nodemon --save-dev
Now, create one file called the server.js and add the following code.
// server.js

const app = require('express')(),
  bodyParser = require('body-parser'),
  cors = require('cors'),
  mongoose = require('mongoose');

  const PORT = process.env.PORT || 4000;

  app.listen(PORT, () => {
    console.log('Listening on port ' + PORT);
  });
The next thing is to connect MongoDB database with our node.js application.
If you have not installed the MongoDB database then install it and then start the mongodb server.
Type the following command to start the MongoDB server.
mongod
So, Now, we need to connect our node.js application to the mongodb database.
Create one file called DB.js inside backend folder.
// DB.js

module.exports = {
  DB: 'mongodb://localhost:27017/reactdates'
};
Import this DB.js file inside our server.js file and use mongoose library to set up the database connection with MongoDB. We can also use Mongoose to save the data in the database using Mongoose ORM.
Write the following code inside the server.js file to connect our MongoDB application to the Node.js server.
// server.js

const app = require('express')(),
  bodyParser = require('body-parser'),
  cors = require('cors'),
  mongoose = require('mongoose')
  config = require('./DB');

  mongoose.Promise = global.Promise;
  mongoose.connect(config.DB, { useNewUrlParser: true }).then(
    () => {console.log('Database is connected') },
    err => { console.log('Can not connect to the database'+ err)}
  );

  const PORT = process.env.PORT || 4000;

  app.use(bodyParser.json());
  app.use(cors());

  app.listen(PORT, () => {
    console.log('Listening on port ' + PORT);
  });
Save a file and go to a terminal and start the node.js server using the following command. Make sure you are inside backend folder root and not in reactdates folder root.
nodemon server
Now, We have the total of three servers are running.
- React Development Server.
- Node.js Server.
- Mongodb Server.
#5: Create a model and Express routes.
Now, we need to create two folders inside the backend folder called routes and models.
In the models’ folder, create one model called DateModel.js.
// DateModel.js

const mongoose = require('mongoose');
const Schema = mongoose.Schema;

let DateModel = new Schema({
  sDate: {
    type: Date
  },
},{
    collection: 'dates'
});

module.exports = mongoose.model('DateModel', DateModel);
Here, we will store only one field called sDate, and its datatype is Date.
In the routes folder, create one file called date.route.js. Add the following code inside the date.route.js file.
// date.route.js

const dateRoute = require('express').Router(),
      DateModel = require('../models/DateModel');

dateRoute.route('/add').post(function (req, res) {
  let datemodel = new DateModel(req.body);
  datemodel.save()
    .then(dateSaved => {
    res.status(200).json({'dateSaved': 'Date in added successfully'});
    })
    .catch(err => {
    res.status(400).send("unable to save to database");
    });
});

module.exports = dateRoute;
Now, our backend work is done. When the POST request hits the route: /dates/add, it will save the values inside the mongodb database.
Our final server.js file looks like this.
// server.js
const app = require('express')(),
  bodyParser = require('body-parser'),
  cors = require('cors'),
  mongoose = require('mongoose')
  config = require('./DB'),
  dateRoute = require('./routes/date.route');

  mongoose.Promise = global.Promise;
  mongoose.connect(config.DB, { useNewUrlParser: true }).then(
    () => {console.log('Database is connected') },
    err => { console.log('Can not connect to the database'+ err)}
  );

  const PORT = process.env.PORT || 4000;

  app.use(bodyParser.json());
  app.use(cors());

  app.use('/dates', dateRoute);

  app.listen(PORT, () => {
    console.log('Listening on port ' + PORT);
  });
#6: Install Axios and send POST request.
Type the following command to install Axios library using the following command, and We need to install it on the frontend, so please open the terminal inside reactdates project root.
yarn add axios

# or

npm install axios --save
Okay, now import the axios inside App.js file and send the data to the Node.js server. Write the final code inside the App.js file.
// server.js

import React, { Component } from 'react';
import DatePicker from 'react-datepicker';
import moment from 'moment';
import axios from 'axios';

import 'react-datepicker/dist/react-datepicker.css';
import 'bootstrap/dist/css/bootstrap.min.css';

class App extends Component {

  constructor (props) {
    super(props)
    this.state = {
      startDate: moment()
    };
    this.handleChange = this.handleChange.bind(this);
    this.handleSubmit = this.handleSubmit.bind(this);
  }

  handleChange(date) {
    this.setState({
      startDate: date
    })
  }

  handleSubmit(e) {
    e.preventDefault();
    let mainDate = this.state.startDate;
    const dateObj = {
      sDate: mainDate.format('L')
    }
    axios.post('http://localhost:4000/dates/add', dateObj)
        .then(res => console.log(res.data));
  }

  render() {
    return (
      <div className = "container">
        <h3>React Datepicker Example</h3>
        <form onSubmit={ this.handleSubmit }>
          <div className="form-group">
            <label>Select Date: </label>
            <DatePicker
              selected={ this.state.startDate }
              onChange={ this.handleChange }
              name="startDate"
              dateFormat="MM/DD/YYYY"
            />
          </div>
          <div className="form-group">
            <button className="btn btn-success">Add Date</button>
          </div>
        </form>
      </div>
    );
  }
}

export default App;
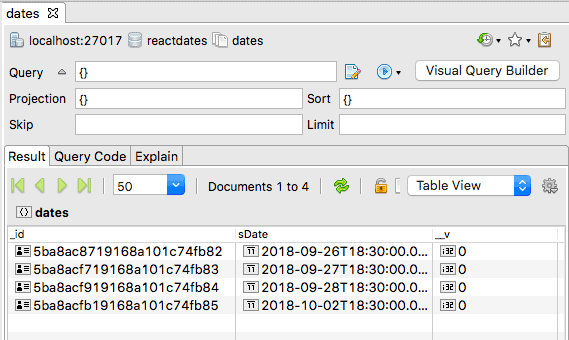
Save the file and go to the browser, select the data and submit the form and you can see in the console that, our date is successfully saved inside MongoDB database.

I have submitted four dates. So in the MongoDB database, there are four entries.
Finally, React Datepicker Tutorial Example From Scratch is over. I have put the code on Github. Please check it out as well.


.png)
0 comments:
Post a Comment
Note: only a member of this blog may post a comment.